
Connect your AWeber account to n8n (an open-source workflow automation platform) to build custom integrations and automations without coding experience.
Note: This connection uses AWeber's API and requires an AWeber Labs account. This is designed for custom integrations and automation. For standard integrations without custom setup, visit our Integrations page.
Step 1: Start Creating Your n8n OAuth Credential
Before creating your AWeber Labs app, you need to get your OAuth Redirect URL from n8n:
-
In n8n, go to "Credentials" and click "Create Credential"
-
Search for and select "OAuth2 API"
-
You'll see the OAuth Redirect URL as the first field at the top of the form - copy this URL (you'll need it in the next step)

-
The URL will be in this format:
https://your-n8n-domain.com/rest/oauth2-credential/callback -
For example:
https://n8n.example.com/rest/oauth2-credential/callbackorhttp://localhost:5678/rest/oauth2-credential/callback -
Important: Use the exact URL shown in your n8n instance - don't manually type it or modify it
-
-
In the Grant Type dropdown, select "Authorization Code"
Note: Leave this credential window open - you'll complete the configuration in Step 3 after creating your AWeber Labs app.
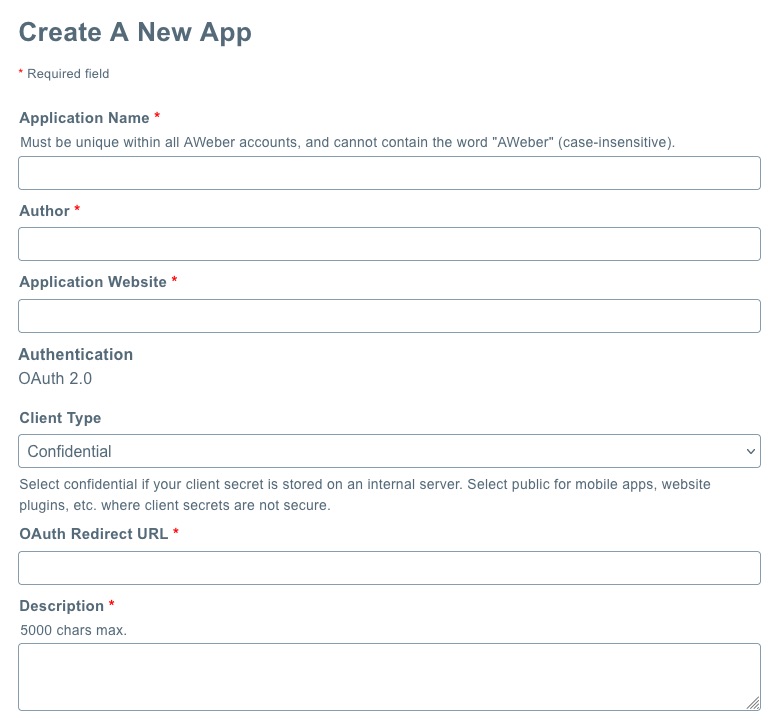
Step 2: Create an AWeber Labs Application
-
Go to AWeber Labs and log in
-
Click "Create A New App" to create a new OAuth2 application
-
Fill in all required fields:
-
Application Name: Enter a descriptive name (example: "n8n Integration")
-
Author: Your name or company name
-
Application Website: Your website URL (or your n8n instance URL)
-
OAuth Redirect URL: Paste the OAuth Redirect URL you copied from n8n in Step 1
-
Description: Brief description of how you'll use the integration
-
-
Save your application
-
On the Apps page, find your newly added app
-
Copy your Client ID and Client Secret (you'll need these in the next step)
Important: Keep your Client Secret secure and never share it publicly.
Step 3: Complete n8n Credentials Configuration
Return to the n8n OAuth2 API credential window you left open in Step 1:
-
Continue configuring the credential using these settings:
Authorization URL: https://auth.aweber.com/oauth2/authorize
Access Token URL: https://auth.aweber.com/oauth2/token
Client ID: Your Client ID from AWeber Labs
Client Secret: Your Client Secret from AWeber Labs
Scope: account.read list.read list.write subscriber.read subscriber.write
Authentication: "Body": Send credentials in body
-
Click "Connect my account" to authorize
-
You'll be redirected to AWeber to grant permissions
-
After authorization, you'll be redirected back to n8n
Step 4: Test Your Connection
-
Add an HTTP Request node to your workflow
-
Set the method to "GET" and URL to
https://api.aweber.com/1.0/accounts -
Under "Authentication," select "Generic Credential Type"
-
For “Generic Auth Type,” select "OAuth2 API"
-
For “OAuth2 API,” select the name of your saved AWeber credentials
-
Execute the node
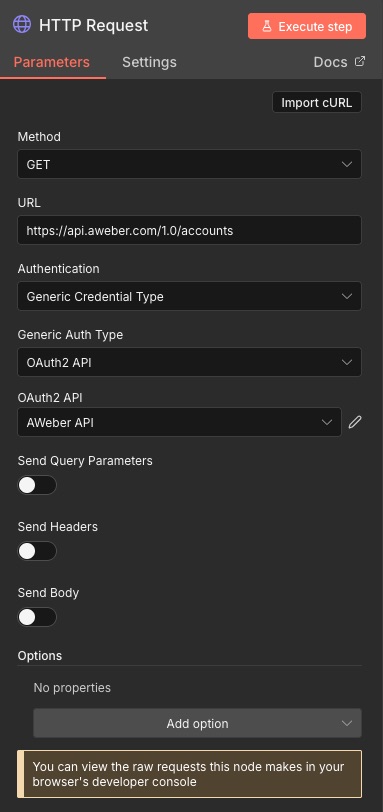
You should see a response containing your account information.
Common Use Cases
Add subscribers from webhooks: Use a Webhook node to receive data, then an HTTP Request node to POST subscriber information to https://api.aweber.com/1.0/accounts/{accountId}/lists/{listId}/subscribers
Find existing subscribers: GET request to https://api.aweber.com/1.0/accounts/{accountId}/lists/{listId}/subscribers?email=subscriber@example.com
Get email lists: GET request to https://api.aweber.com/1.0/accounts/{accountId}/lists
Update subscriber information: PATCH request to https://api.aweber.com/1.0/accounts/{accountId}/lists/{listId}/subscribers to update subscriber details (name, custom fields, tags)
Rate Limits
AWeber's API allows 120 requests per minute. If you exceed this limit, you'll receive an HTTP 403 response with the message "Rate Limit Error" and be blocked for 60 seconds. Add Wait nodes between API calls when processing multiple subscribers to stay under this limit.