
Authenticating your email domain with DKIM (DomainKeys Identified Mail) and DMARC (Domain-based Message Authentication, Reporting, and Conformance) is essential for ensuring your emails are trusted by recipients and comply with major email providers' requirements. AWeber offers both automatic and manual methods to set up these authentication protocols.
If you haven’t added your email address yet, add and verify your email address before proceeding to set up DKIM and DMARC authentication.
Note: AWeber verifies your domain's sender-authentication status each time a broadcast is sent. If your domain is no longer authenticated at send time, your broadcast will be returned to Draft status and you will receive a notification to re-authenticate before sending. Keeping your DKIM records active ensures uninterrupted delivery.
Why Authenticate with DKIM and DMARC?
-
Comply with Provider Requirements: Meet the authentication standards set by providers like Gmail and Yahoo.
-
Enhance Deliverability: Authenticated emails are more likely to reach inboxes.
-
Protect Your Brand: Prevent unauthorized use of your domain in phishing or spoofing attacks.
Method 1: Automatic Setup via "Connect Domain"
Automatic DKIM and DMARC setup is supported for over 40 domain providers.
Steps:
-
Navigate to Domains and Addresses within your account.
-
Mouse over your domain and click the "Automatically Connect Domain" icon to the right of the domain.

-
Follow the prompts to authenticate with your domain provider.
A popup will appear prompting you to connect your domain to AWeber, simply click the "Continue" button.
After a few moments of loading you'll be prompted to insert your login credentials for your domain provider or authorize directly via the domain provider you're using. Simply fill out the credentials and click "Continue."
If it directs you to the domain provider, follow along with the prompts within your domain provider until the records have been setup.
It will take a few moments to authenticate the domain and setup the records automatically for you. Once it's complete it will inform you that your domain has been configured.
-
Once connected, AWeber will automatically configure the necessary DKIM and DMARC records.
Note: This process sets up both DKIM and DMARC simultaneously.
Method 2: Manual Setup
If you don’t see the “connect domain” option, then your DNS provider isn't supported for automatic setup. You can manually add the required DNS records through your DNS provider.
Steps:
-
Access your domain's DNS settings through your DNS provider (e.g., Namecheap, Cloudflare).
-
Navigate to Domains and Addresses within your account.
-
Mouse over your domain and click the gear icon to the right to your domain to view the DKIM and DMARC records.

-
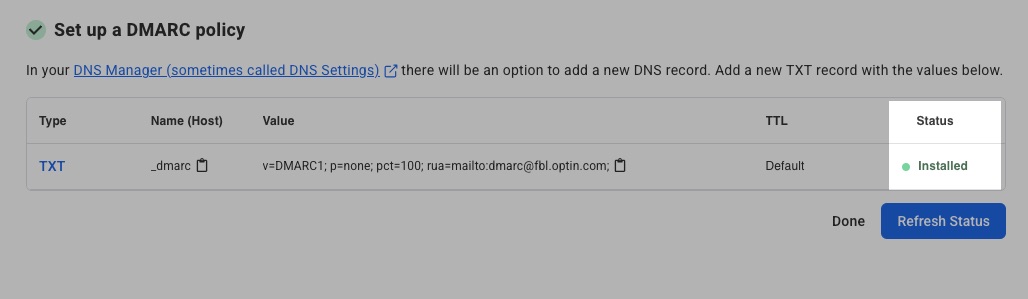
Add the provided CNAME records for DKIM and the TXT record for DMARC to your domain's DNS settings.
|
Record Type |
Name |
Value |
TTL |
|---|---|---|---|
|
CNAME |
aweber_key_a._domainkey |
aweber_key_a.send.aweber.com |
Default |
|
CNAME |
aweber_key_b._domainkey |
aweber_key_b.send.aweber.com |
Default |
|
CNAME |
aweber_key_c._domainkey |
aweber_key_c.send.aweber.com |
Default |
-
Save the changes and allow up to 48 hours for the records to propagate.
Tip: For detailed instructions specific to your domain provider, refer to their support documentation or contact their support team.
Verifying Your Setup
After setting up DKIM and DMARC, you can verify their status in AWeber:
-
Navigate to Domains and Addresses within your account.
-
Click the gear icon next to your domain to view the status of your DKIM and DMARC records.

-
If the records are installed correctly, each record will show as “Installed”:
DKIM: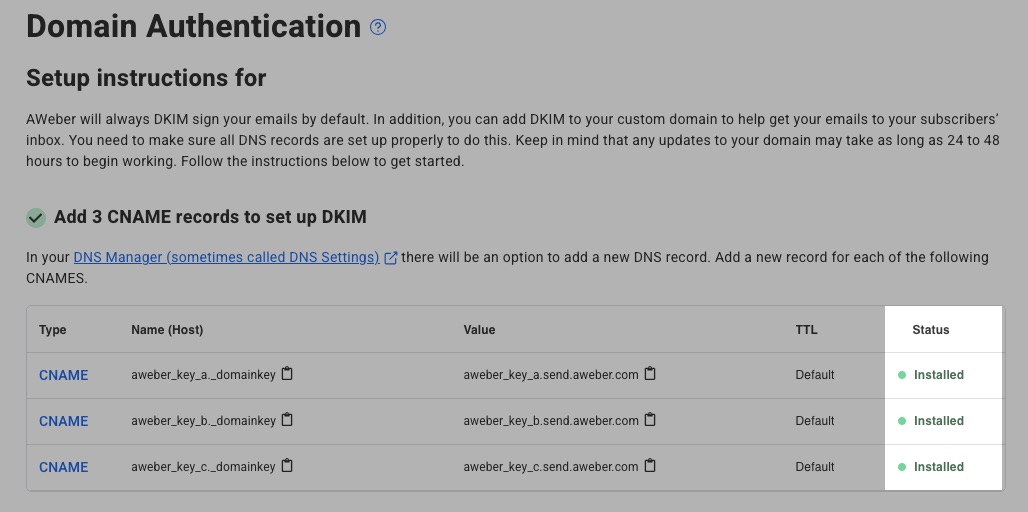
DMARC:
Note: DNS changes may take up to 48 hours to reflect.
Troubleshooting DMARC Authentication Issues
Multiple DMARC Records Error
Issue: Error message shows "2 or more DMARC records found"
Solution:
-
Log into your DNS management panel
-
Look for all TXT records named
_dmarcor_dmarc.yourdomain.com -
Delete duplicate records - keep only ONE with value:
v=DMARC1; p=none; pct=100; rua=mailto:dmarc@fbl.optin.com; -
Wait 24-48 hours for DNS propagation
Quotation Marks in DMARC Value
Issue: DMARC record includes quotation marks
Incorrect: "v=DMARC1; p=none; pct=100; rua=mailto:dmarc@fbl.optin.com;"
Correct: v=DMARC1; p=none; pct=100; rua=mailto:dmarc@fbl.optin.com;
Solution: Edit your _dmarc TXT record and remove the opening and closing quotation marks.
Troubleshooting: Sender Email Stuck in "Needs Authentication"
Issue: Domain is authenticated, but a sender email shows "Needs authentication" status.
Solutions:
-
Wait 24-48 hours - DNS records may still be propagating
-
Check verification email:
-
Check spam/junk folders
-
Verify the mailbox is receiving mail
-